Links

Sep 27, 2007

Advanced Particle Effects

Advanced Particle Effects
Description: Surfing through the web I came across this excellent web site on ofcourse Photoshop Tutorials. It is named Pixelmana.com. I don't know the meaning but what i know is this site some excellent tutorials like this, I'm sharing with you. Pixelmana.com says:

This tutorial will show you how to create particle effects in Photoshop. Keep in mind that I only provide the basic guidelines to creating this type of effect. There are tons of possibilities if you experiment and keep your creativity wide open.
Read the full tutorial here.

Enjoy this tutorial.

Labels: ,

Sep 23, 2007

Creative Focus with Lens Blur

Creative Focus with Lens Blur
Description: This tutorial will give you some beautiful insight on creative composition. Originally published at photoshopessentials.com. Written By Steve Patterson, who says:

In this Adobe Photoshop tutorial, we're going learn how to add creative focus to an image using Photoshop's Lens Blur filter, which has been available in Photoshop since Photoshop CS (which means you'll need Photoshop CS, CS2 or CS3 for this tutorial). When most people think of adding a blurring effect to an image in Photoshop, they immediately think of the Gaussian Blur filter, which has been around in Photoshop since the days of the dinosaurs (they used Photoshop BC back then). While Gaussian Blur is still a great filter with plenty of uses, it doesn't offer us much in terms of control over the blurring effect and usually needs to be paired up with a layer mask for it to be of any real use. Photoshop's Lens Blur filter, on the other hand, offers an incredible amount of control over the effect (more than you'll most likely ever need), and when used with an easy-to-create Depth Map, as we'll see in this tutorial, we can specify exactly how much blurring to apply to different areas of the image, giving us complete creative control over which areas are in focus and which are not.

Read further and full tutorial here...

Labels: , ,

Sep 19, 2007

Advance Glow Effects

Advance Glow Effects
Description: Wow! Awesome. That's what all i can say about this advance glow effects tutorial. Look at the final result of this photoshop tutorial. Originally published at PSDTuts.com and written by COLLIS. Great work mate, i must say. Author says about photoshop tutorial :
In this tutorial we're going to create some really sharp looking glow effects using a combination of layer styles, the pen tool and colour blending. The end effect is quite stunning and hopefully you'll pick up some tips you didn't know before.
You can even download the example PSD file from the site!!!

Read this great photoshop tutorial here

Labels:

Sep 16, 2007

Glamour Retouching

Glamour Retouching
Description: Great Glamour Photoshop Retouching Tutorial . Author says:
"In this tutorial, we’ll look at a quick and easy way to use Photoshop to add glamour and soft focus effects to an image. This effect is used a lot on models, but can be applied to other images too for added impact, especially color rich ones. We’ll also make the bunch of techniques into a Photoshop action, meaning that in future it’ll take just one click to apply the effect."

Labels: ,

Sep 13, 2007

Lighting and Shadow Tutorials

Lighting and Shadow Tutorials
Description: In this photoshop lighting tutorial we'll learn something about "Three-point-light" model, which is - according to Wikipedia - "a very common lighting technique, used in both still photography and in film". It is in fact, a classical, simple scheme to achieve a softer lighting over some scene. Using three different light sources, one can illuminate a subject (a person or some object) , and by controlling light, shading and shadows, can emulate 3D object aspect in 2D areas. The light scheme is used to model the scene, so the viewer can see the shapes, shadows, and how these objects relates to others.

Read Full Tutorial Here

Labels: ,

Sep 6, 2007

Enhance Colors Using Photo Filter

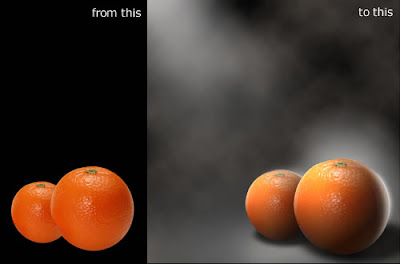
Professional photographers use filters to correct lighting conditions, enhance specific colors, and create special effects such as fog, vignettes, and cross stars. You can apply photographic-style filters in Photoshop using the Photo Filter command. The Photoshop photo filters recolor photographs by enhancing warm or cool colors, or by completely retinting the photograph to a specific hue such as yellow, magenta, brown, or blue.

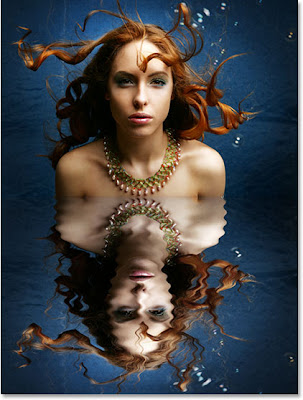
In this technique, you find out how to apply Photoshop's photo filters to recolor your photographs. Also, you discover how to make your photographs look like old-time sepia-toned photos. So, find an interesting photograph and experiment with photo filters!

Enhance Colors Using Photo Filter
About this photoshop photo filter tutorial : This tutorial is written by Steve Patterson for Photoshop Essentials.com. He says:
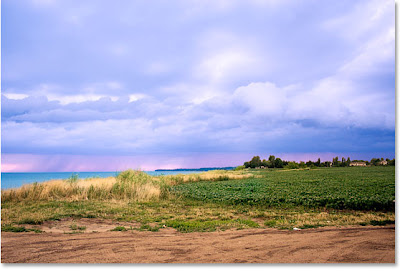
If Photoshop's Photo Filter isn't one of the most widely used features in the program, it certainly deserves to be. Not only is it easy to use, it's the only feature in Photoshop that lets you choose colors simply by selecting color names from a list! It also has several valuable uses, one of which we've already looked at in a previous tutorial - Neutralizing Color Casts With The Photo Filter - and this time, we're going to learn how to use it to tint and enhance colors in an image.
Read Full Tutorial Here

Labels: , ,

Sep 3, 2007

Food Photography and Styling

Food Photography and Styling
Description: An introduction into the art of food photography, both historically, and practically as an insight into the tools used by professionals to create the illusion of a culinary masterpiece in each frame.

Here’s a brief overview. There are two types of still food photography: editorial photos for a book or periodical and advertising photos. Understandably, advertisers want their product prominently featured and in full focus. Editorial work allows for greater creativity on both the part of the photographer and food stylist than advertisements. In the professional world, the food stylist and photographer work together to create the look.

For the purpose of this article, I will focus on editorial work. Within this genre, again there are primarily two types of shots: process shots known as step shots where a technique or action is captured and explained and straight editorial shots of food. Step shots are always clear and in perfect focus throughout; editorial can be artistic.

Read Full Tutorial at Worth1000.com

Labels: ,

Sep 1, 2007

Realistic Water Reflections

Realistic Water Reflections
Description: This is an awesome photoshop tutorial about adding realistic water reflection to any photograph, written By Steve Patterson at photoshopessentials.com. Personally I loved this tutorial and thats why I'm sharing this with you.

After reading thousands of photoshop tutorials , you probably know by now that there is nothing new or groundbreaking. Every tool is same. But it is the creativity that stands out at the end.

Steve, the author of this tutorial says:

In this Photoshop photo effects tutorial, we're going to learn how to easily add a realistic water reflection to any photo. It's a very easy effect to create and you can add it to any photo you like, although it tends to work best with images that don't already contain water in them.
We'll be using a simple filter and a displacement map to create the water ripple effect, and a Hue/Saturation adjustment layer to give our water a little color.


So, enjoy this fabulous tutorial.

Read full tutorial here

Labels:

Other Posts

Subscribe to this blog's feed

Enter your email address:

Delivered by FeedBurner

Add to Technorati Favorites
Add to My Yahoo!
Add to Google
Subscribe in NewsGator Online
Add your feed to Newsburst from CNET News.com
Add to SiteShuffle
Add to myAOL
Subscribe in FeedLounge
Subscribe with Bloglines
Add to Pageflakes
Subscribe in NewsAlloy

Privacy Policy

”"